This tutorial series is for the beginner tabletop miniature painter. It is divided into the six steps I use to get the models to the table quickly with minimal effort with a good tabletop quality paint job. For an explanation of what is meant by tabletop quality read this article.
Note: Even though this tutorial uses a unit of Rebel Troopers as an example the skills demonstrated will apply to any other unit of models that you want to get done in a short amount of time.
The steps I use to paint gaming miniatures to tabletop quality are as follows:
- Assembly
- Priming
- Base coating
- Apply Wash
- Highlighting by Dry Brushing
- Finish the Base of the miniature
What is Dry Brushing?
Dry brushing is a method of painting miniatures used to highlight your models. You quickly apply a small amount of paint to the raised edges of the texture of your models. Dry brushing is typically done with a stiff-bristled brush. This is a good Dry Brush to start with, but this set is my favorite.
Dry brushing is essentially the opposite of applying a wash. When washing you are applying thin paint to the recesses of the model to show shadows and shading. Dry brushing is applying very small amounts of undiluted paint to the tops of the textures bumps and ridges of your models. this will show the reflections that would occur in natural light. Using dry brushing in connection with washing helps to create a dynamic range that is more appealing to the eye than single flat colors.
I generally will wash a model before I dry brush it. Since washes start in the raised area and then they flow to the lower areas of the models. The wash can obscure or at least lessen the effects of a dry brushed highlight.
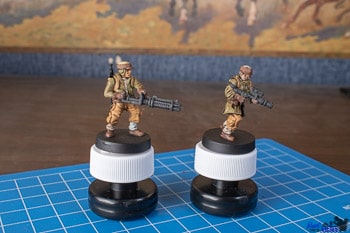
You can see the effects of dry brushing on these two models in the following two images. In the second image, you can see that the small bumps and ridges are more defined after dry brushing.


What you need to Dry Brush Models
You will need a model. the more texture your model has the better candidate it is for dry brushing. Smooth flat surfaces are not great for the dry brushing process as will be explained below.
You need a brush with stiff bristles. These types of brushes are commonly referred to as dry brushes. Many brush lines even have at least one brush that is sold as a dry brush. These brushes come in two basic types, round brushes, and flat brushes. Round brushes are good if you have a large area to cover and you need less precision. Flat brushes are good to use when you need control where two different colors meet without getting too much overlap.

Paint, some paint lines market dry paint. The truth is that you can use any type of acrylic paint for this process. The type that is marketed as dry is just extra thick paint that has an almost spongy texture to it. You still can’t just put your brush into the pot and then straight to your model. If you attempt this you will likely take too much paint over to it.
A paper towel will be very useful for ensuring that you have the proper amount of paint on the tip of your brush. I prefer to use one that is white without other decorative colors. This makes it easier to see paint that is coming off of the brush when you test it.
You can see that on the first pass on the paper towel with this grey paint there was enough paint that it would totally ruin the model. The second pass also has too much paint on the brush. The faint pass of paint on the third pass down is the amount of paint that I prefer to have on my dry brush when I do my dry brushing. It might not seem like you have any left, but if you have too much you will go overboard on your model in a hurry, ruining the effect.

How to choose the right color for dry brushing
When planning your model paint scheme, your base paint is a bit brighter than you want to end up with because the wash will darken it. Then the wash is typically in the same family of colors, ie. a dark green wash is painted over medium green to achieve shadows that look like they are on a green surface. The same principle applies to dry brushing.
Many people will use the same color that they used for the base color coat, either alone or with a little white mixed into it. The amount of white paint that you mix in depends on the amount of change that occurred from the wash. If your wash darkened the model considerably then using the color that you used for your base coat will provide enough contrast to be noticeable. If you thinned down your wash so that it didn’t affect the base color very much, then you will need to mix in a bit of white to brighten it up.
How to apply the paint
Unlike base coating and washing, dry brushing works best with thick paint. put a small amount of paint onto your pallet. Mix it to get the desired color just as you would normally except that you will not use any type of thinning agent. Some people will transfer the paint from their pallet to their paper towel at this point so that some of the moisture will be wicked away from the paint. Experiment with different methods until you find the one that you enjoy.
Dip just the very tip of your dry brush lightly into the paint. Using the paper towel draw the brush across it until you can barely see any paint coming off of it. I know that the first time you do this it seems very strange but this is the best method for dry brushing.
Using a quick motion, lightly flick the bristles of your brush across the surface of your model. After a few passes, you will notice the edges and raised surfaces of your model will begin to lighten. What is happening is that the very little paint that is left on the brush is being scraped off of the bristles and sticking to the edges and raised surfaces where they come into contact with each other.
Dry brushing will build up slowly if done with the correct amount of paint on your brush. This will make it easier to stop when you get to an appropriate level of coverage.
It is important to make sure that you use quick motions across the surface of the model. If you go too slowly the bristles will get down into the recesses of your model and some paint will be placed on top of your wash undoing what you have done in the previous step.
Important tips for dry brushing
I know it sounds obvious but, dry brushing is done with a dry brush. If you get your brush wet it will change the effect entirely. If you accidentally get your brush wet change brushes and let that one dry thoroughly before using it again.
Dry brushing is very rough on your brush. Because you are quickly hitting the edge of the brush over and over again on your model the brush will wear out much quicker than other brushes. Don’t go overboard with the price of your dry brush. Because of the method used, inexpensive brushes work just as well as expensive ones.
Like other techniques, this will take some time to master. Try not to get discouraged if it doesn’t click right away. The first time that I did this I left way too much paint on the brush and completely ruined to model with the first pass of the brush. Patience is truly a virtue when it comes to learning new painting techniques.
These are my recommendations of things that I use all the time when painting miniatures
The Starter Paint Set That I Recommend for small budgets
The Starter Paint Set That I Recommend for large budgets
I like to listen to books on Audible while I paint
Check out these retailers to find hobby products
HOBBY STORES
USA / Canada: Noble Knight Games : eBay (US) :
UK: Element Games : Forbidden Planet
Global: Amazon : Redgrass Games : Warcolours
3D PRINTING
Anycubic : Elegoo : Creality : Sunlu : Flashforge : Matterhackers :

