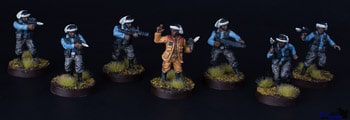
This project is how I painted a unit of Rebel Fleet troopers from the Star Wars Legion tabletop skirmish game by Fantasy Flight Games.

You can find the models here.
I have put together a couple of other star wars legion painting tutorials that you can find at the links below
Materials Used
Paint:
Here is a list of the paints that I used when painting this model
- Mechanicus Standard Grey primer
- Layer paints
- Army Painter Deep Blue
- Army Painter Dungeon Grey
- Army Painter Fog Grey
- Army Painter Fur Brown
- Army Painter Necromancer Cloak
- Army Painter Troll Claw
- Citadel Rinox Hide
- Citadel XV-88
- P3 Bastion Grey
- P3 Menoth White Highlight
- P3 Pig Iron
- P3 Rucksack Tan
- P3 Thamar Black
- Reaper Dark Highlights
- Reaper Tanned Highlights
- Washes
Finishing Materials:
Brushes:
You will need a few different brushes to paint the Fleet Troopers:
- A good quality base coating brush. I used an Army Painter Base Coat brush.
- A medium sized brush for relatively small areas and two brush blending
- A fine detail brush for the small details that like belts
- A dry brush, I used a medium round dry brush by Citadel
Steps:
Assemble:
The mold lines for these models weren’t too bad on their legs they ran the mold to line up with the stripe on their pants. There were some significant lines to be removed from around their heads. I used the back of my hobby knife to lightly scrape these away. The plastic used for these models is quite soft and removes easily so you don’t have to press very hard. I chose to paint these models with their arms disconnected if they formed loops. The ones that have their arms apart were just fine to assemble fully before painting.
For an article that has a lot of tips for assembling models click here.
Prime:
I primed these models with Citadel Mechanicus Standard Grey primer. Because this color is very neutral it allows me to really thin down my paint so that it will flow better when I paint it on, as well as build up semi translucent layers of colors.
If you have any questions about how to prime models I have an article about it here.
Base Coat:
The first few steps of painting these models are the same for the regular troopers and the Captain. I will indicate when they start to be different. I used the blocking method to base coat these models in an assembly line. This just means that I painted areas of like colors on each of the models and then changed the color. I like to start with the lightest colors first, and work my way to darker areas of the models. This is because mistakes made with a light color are more easily covered up with a darker paint than the other way around. Make sure to thin your paint so that it flows well over the model. It is better to use multiple thin layers than to cover up details with paint that is too thick. I prefer to use Reaper Flow Improver, but you can use water if you prefer.

I started with painting their Helmets P3 Menoth White Highlight. I used this slightly off white color so that I could have some spectrum left for highlighting later. If I had started with pure white I would only be able to take the color toward shadows.
Don’t forget that the front half of their blasters are also white. I used the same P3 Menoth White Highlight to paint this area of the baster and the tip of the scope on the weapon as well.
Second I used P3 Thamar Black mixed with just a hint of P3 Menoth White Highlight to paint the boots, the visor and strap on the helmet, and the back half of the blaster.
Next I moved to their trousers. I used P3 Bastian Grey. This is a great color for their pants. I thinned the paint and applied it in a couple of thin layers.
The flesh of the troopers came in a variety of shades. I used Reaper Tanned highlight and Reaper Dark Highlight to achieve a variation of skin tones on the faces and hands of the models.
This is the point where the general troopers differ from the Captain. This tutorial will continue with the troopers and then I will cover the Captain after it is finished with them.
I painted the shirt Army Painter Fog Grey which is actually a very pale blue color despite the name saying grey. It gives the shirts a nice contrast to the rest of the uniform that is mostly dark.
I used Army Painter Necromancer Grey to paint the vest. Just like using off white for the helmets, I used this dark grey color to allow myself to have room to push the shade in either direction that I wanted to later in the project.
Citadel Rinox Hide is one of my preferred colors for leather bits like the belts on these troopers.
I used P3 Pig Iron to finish their belt buckles and to paint the antenna on each helmet.
Then I went back over the models quickly and touched up where I had gotten some paint on top of other colors and parts that I had missed on a couple of the models like the chin straps of the helmets.
If you have any questions about proper base coating techniques I have an article about it here.
Shading:
Most of the time I will get my shadows set in place before going on to my highlights. I chose Citadel Nuln Oil pre-made wash on the majority of this model. I like the way that it looks on the trousers and vest. I guided it into the creases with the tip of my brush to get the shadows into the right places. I thinned the wash down to about half water to shade the helmet. Because the helmet is white, you need to be cautious to guide the wash into the creases where shadows would naturally form and avoid getting too much on the flat surfaces.
I used Army Painter Blue Wash thinned with water to get shadows onto the folds of the shirt. I selectively used the tip of a fine brush to guide the wash into the recesses of the shirt. I went sparingly because I didn’t want to change the light color of the shirt, just emphasize the natural shadows.
I used Army Painter Flesh Wash on the flesh of the model. I tried to get it to pool in their eyes a little more so that it made it look like some definition. When I am painting for tabletop play I almost never paint eyes.

If you have any questions about applying washes I have an article about using them here.
Highlights:
I dry brushed Army Painter Dungeon Grey to highlight the trousers, boots and vest of each trooper. You shouldn’t dilute your paint while dry brushing. The thick paint will give better highlights without flowing into other areas.
No matter how careful you are with dry brushing there will always be some paint that gets where you don’t want it. You can see in the picture below that there are a lot of areas that will require some touch up,
I have an article with tips for dry brushing here.
Next I used a technique called two brush wet blending to highlight the helmets. Wet blending works better on smooth surfaces like these helmets and dry brushing tends to work better on surfaces with texture like their trousers or shirt. Most of the time it is fine to use well thinned paint and just put a dab at the crown of the helmet then pull it over the area with a wet brush. But since I live in a dry arid climate, The west desert, I need to get the surface of the helmet wet before I put a little white paint on it. Then using a second clean brush that is loaded with water I lightly drag the white paint over the rest of the helmet. Leaving the top almost pure white and feathering it toward the edge. This gradient looks really nice and is very easy to do once you have even a little practice.
I mixed some P3 Menoth White Highlights with the Reaper Tanned Highlights and used them to highlight the faces and hands.

Fleet Trooper Captain
The boots, skin, and helmet are painted the same as the regular troopers. Here I will go over the difference between the Captain and the rest of the troops.
Base Coating the Captain
I painted the Jacket and trousers of the Captain with P3 Rucksack Tan. The dark accent sections of the yoke of the jacket and the stripe of the pants are painted with Army Painter Fur Brown. I painted his shirt under the Jacket with Citadel XV-88. His rank plaque is picked out with a very fine brush using Army Painter Deep Blue.
Shading and Highlighting the Captain
I used Citadel Seraphim Sepia to shade the tan areas of the captain and the rest I shaded identically to the regular troopers. To bring out the highlighted areas of the Captain I dry brushed Army Painter Troll Claw over the tan areas. The remainder I highlighted identically to the rest of the troopers.

Touch up and seal your paint:
Touch up any areas that got extra paint on them from your dry brushing or any other painting.
Once you are happy with your paint you should seal it. I like to use a dull coat made by Army Painter but you can use any sealer that you like. This coat is optional, I know several people who dislike the look that sealants give, but it does provide some protection to prevent chipping as you will be transporting your miniatures and handling your miniatures a lot during game play. Ultimately it your model and it is up to you.
Finishing the Base:
For this my Rebel army models I wanted to give them the look of being out slogging through the mud, muck and grime. I used Citadel Stirland Mud on the base of this model. It makes the base look like it is covered in mud. I then placed some some Army Painter Jungle Tufts of grass onto the base while the mud was still wet. Doing this while it was still wet allowed me to use the mud as an adhesive rather than using glue. I feel that these pre-formed clumps of grass are a great way to get great looking grass onto the base of your miniatures simply and easily.
I used some Gale Force Nine Summer Flock to give the look of some more foliage on the base near her feet. I simply pinched a bit of it between my fingers and dropped it in a clump while the mud was still quite wet. After it had time to dry a bit, I tapped it on its edges and the lose parts fell off of the base and left only a little that made it look more natural than the large clumps that I originally had on there.
To continue the mud look on the rest of the base, I painted the edges with Citadel Rinox Hide. This color is a rich dark brown that extended the feel of the muddy base without interfering with movement templates. I made the paint uneven and sloppy to maintain the feel of the mud.
These are my recommendations of things that I use all the time when painting miniatures
The Starter Paint Set That I Recommend for small budgets
The Starter Paint Set That I Recommend for large budgets
I like to listen to books on Audible while I paint
Check out these retailers to find hobby products
HOBBY STORES
USA / Canada: Noble Knight Games : eBay (US) :
UK: Element Games : Forbidden Planet
Global: Amazon : Redgrass Games : Warcolours
3D PRINTING
Anycubic : Elegoo : Creality : Sunlu : Flashforge : Matterhackers :

