“My lord, I’ve reached the main power generators. The shield will be down in moments, you may start your landing.”
-General Veers The Empire Strikes Back

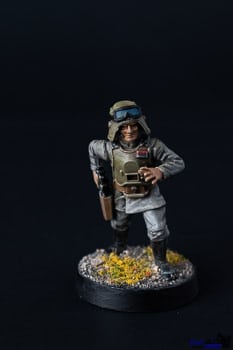
General Maximilian Veers is most well known for leading the ground assault on Hoth against the rebel base. He is the second commander to be available for the imperial faction on the game Star Wars Legion, published by Fantasy Flight Games.
Materials Used
You can find this model here.
A couple of other Star Wars Legion painting tutorials can be found at the following links:
Paint:
Here is a list of the paints that I used when painting this model
- Mechanicus Standard Grey primer
- Layer paints
- P3 Bastion Grey
- P3 Traitor Green
- Reaper Tanned Highlights
- Citadel Abaddon Black
- P3 Pig Iron
- P3 Gun Corps Brown
- Reaper Fire Red
- Army Painter Deep Blue
- P3 Menoth White Highlights
- Washes
- Army Painter Soft Tone
- Army Painter Strong Tone
- Citadel Nuln Oil
- Citadel Agrax Earthshade
Brushes:
You will need a few different brushes to paint General Veers.
- A good quality base coating brush. I use an Army Painter Base Coat brush.
- A medium sized brush for relatively small areas and two brush blending
- A fine detail brush for the small details that are on him like his rank insignia
- A dry brush, I used a medium round dry brush by Citadel
Finishing Materials:
- Gale Force Nine Basing Sand
- Gale Force Nine Green Flock
Steps:
Assemble:
The mold lines for this model weren’t too bad on his legs. There were some significant lines to be removed on his helmet and shoulders though. I used the back of my hobby knife to lightly scrape these away. The plastic used for these models is quite soft and removed easily so you don’t have to press very hard. The standard pose for this model is pretty good for pre-assembly before painting, he doesn’t have weapons or arms that really block access to areas of the model that will be noticeable.
For an article that has a lot of tips for assembling models read it here.
Prime:
I primed this model with grey primer for two reasons. First, the grey of his uniform is very close to the Citadel Mechanicus Standard Grey paint that I used. This will make it easier if I were to miss a small part of his uniform. It would not be as noticeable as if you had used white or black because of the contrast of colors. The second reason is that this color allows me to really thin down my paint so that it will flow better when I paint it on, as well as build up semi-translucent layers of colors.

If you have any questions about how to prime models I have an article about it here.
Base Coat:
I like to start with the lightest colors first and work my way to darker areas of the models. This is because mistakes made with light colors are more easily covered up with darker paint than the other way around. I started with General Veers’ exposed face and hands, applying thin layers of Reaper Tanned Highlights.
I then applied thin layers of Bastion Grey to the cloth portions of is uniform. After I got a good opacity of grey on his uniform I mixed in an equal portion of Traitor Green this maintained uniformity with the rest of his uniform without it being too stark of a contrast.
Next I mixed up a bit of Abaddon Black with a couple drops of flow improver to use on his boots. They covered nicely with just a couple of layers. I used this same paint to paint the trim around his goggles and the strap that holds them to his helmet, and the shoulder straps of his chest armor.
The blasters in Star Wars are black metal, so painting them Gun Metal Gray or Bolt Gun Metal, wouldn’t look right. To achieve a metallic sheen for the black weapons I mixed in P3 Pig Iron to the rest of my black paint. The Pig Iron is already a fairly dark metal color so it didn’t affect the color of the paint too much, but the metallic flakes in the paint turned the black into a metallic black.
Next I used P3 Gun Corps Brown to give a nice brown color to all of the bits that are supposed to be leather. These were his belt and blaster holster. Reaper’s Fire Red and Army Painter’s Deep Blue were used to paint his rank insignia.
I used the same Army Painter Deep Blue paint to paint the lenses of his goggles. I applied some well thinned paint of the top and then used a clean wet brush to feather the paint down over the area of the lens being careful not to lift my brush in the process to avoid missing any areas or to cause unnatural pooling.
If you have any questions about proper base coating techniques I have an article about it here.

Shadows:
Most of the times I will get my shadows set in place before going on to my highlights. I chose to use Army Painter’s Soft Tone pre-made wash on the majority of this model. I like the way that it looks on flesh and leather. I thought that it interacted well with the armor, better than other colors. Apply this wash fairly liberally guiding it into the natural low points with the tip of your brush.
I then thinned down the Citadel Nuln Oil wash on my pallet with a drop of water to make it less intense. I carefully applied it to the folds of his cloth uniform. His uniform is neat and clean so try not to let it build up on the raised areas too much, to maintain that appearance.
If you have any questions about washes I have an article that I wrote about the basics of using them here.

Highlights:
I mixed a little P3 Menoth White Highlights into each of the original paint colors to make my highlight colors. I then did a very light dry brush over each large area to bring out the highlights. Be careful to avoid too heavy handed application of your dry brushing as it can go past nice highlighting quickly and begin to make your model look muddy instead.
No matter how careful you are with dry brushing there will always be some paint that gets where you don’t want it. You can see in the picture below that there are a lot of areas that will require some touch up, like on his goggles, and some green on his sleeve.
I have an article with tips for dry brushing here.

Touch up and sealing your paint:
Touch up any areas that got extra paint on them from your dry brushing. I had to paint over his goggles and touch up his blaster where I got a little heavy handed with the highlights. I also applied a second coat of blue paint to his goggle lenses to clean them up.
Once you are happy with your paint you should seal it. I like to use a dull coat made by Army Painter but you can use any sealer that you like. This coat is optional, I know several people who dislike the look that sealants give, but it does provide some protection to prevent chipping as you will be transporting your miniatures and handling your miniatures a lot during game play. Ultimately it your model and it is up to you.
Finishing the Base:
Make a 1:1 mix of white PVA glue with water. then using an old brush to paint this mixture onto the base. Be careful to avoid his feet and legs. Then evenly apply the basing sand to the glue mixture. I used Agrax Earthshade wash from Citadel to give the sand a uniformly brown look and made it look a bit dirtier.
Then I used some green flock that is made by Gale Force Nine to make it look like some grass is growing on the base near his feet. I simply pinched a bit of it between my fingers and dropped it in a clump while the wash was still quite wet. After it had time to dry I tapped it on its edges and the lose parts fell off of the base and left only a lit that made it look more natural than the large clumps that I originally had on there.
I hope that you enjoy painting your General Veers model. This is the method that I used for this model, but you can adapt it to your own color preferences and style. I have seen some interesting color schemes out there and even though I like to keep mine close to the classic color scheme, if you want purple armor on your imperial troops have at it.
If you are new to miniature painting check out my New Mini Painters Guide for tips and trick for getting started in this fun hobby.
These are my recommendations of things that I use all the time when painting miniatures
The Starter Paint Set That I Recommend for small budgets
The Starter Paint Set That I Recommend for large budgets
I like to listen to books on Audible while I paint
Check out these retailers to find hobby products
HOBBY STORES
USA / Canada: Noble Knight Games : eBay (US) :
UK: Element Games : Forbidden Planet
Global: Amazon : Redgrass Games : Warcolours
3D PRINTING
Anycubic : Elegoo : Creality : Sunlu : Flashforge : Matterhackers :

