What is a Wash?
A wash is a technique used when painting tabletop miniatures to create depth, and shading, and add subtle color variations to the model. It involves diluting acrylic paint with water or a specialized medium to create a thinner, more transparent consistency that can flow easily into the recesses and details of a miniature. This helps accentuate the details and creates a more realistic, visually appealing appearance. Washes can be made from other types of paints such as enamels and oils. But for this article, I will be focusing exclusively on acrylic washes because they are the most common type that mini painters use.
Table of Contents
Why use a wash?
- Enhance details: The wash settles into the recesses, grooves, and textures of the miniature, emphasizing its details and making them more visible.
- Create depth and contrast: The wash adds shading and depth by darkening recessed areas, providing contrast between raised surfaces and recesses.
- Add subtle color variations: Washes can be used to blend colors, create gradients, and add subtle tonal variations to your miniature.
- Improve realism: The wash can create a more natural, weathered appearance, making the miniature look more lifelike and visually interesting.
Useful Tools for Washes
Several tools can be helpful when using washes to paint miniatures. Some of these tools include:
- Brushes: Having a good set of brushes is essential for applying washes. A brush with a fine tip and a good belly (the wider part of the bristles) is ideal for wash application. It’s also helpful to have a separate brush for wicking away excess wash or feathering.
- Mixing palette: A mixing palette, such as a ceramic or plastic palette, is useful for mixing custom washes and controlling the consistency of pre-made washes. The palette allows you to test the wash before applying it to the miniature.
- Dropper bottles: When mixing custom washes, dropper bottles can be helpful for controlling the amount of paint, water, or medium you add. They also provide a convenient storage option for homemade washes.
- Flow improver or acrylic glazing liquid: These additives can be mixed with acrylic paint to create smoother, more consistent washes. They help improve the flow and drying properties of the wash, reducing issues like coffee staining or tide marks.
- Pipette or eyedropper: A pipette or eyedropper is useful for accurately measuring and mixing small amounts of paint, water, or medium when creating custom washes.
- Paper towels: Having paper towels handy is essential for cleaning brushes, wicking away excess wash from the brush, and dabbing away excess wash on the miniature.
- Water pot: A water pot or container is necessary for cleaning brushes and diluting washes as needed.
- Test material or spare miniature: Before applying a wash to your main miniature, it’s helpful to test it on a spare miniature or scrap piece of material to ensure the desired consistency, color, and coverage.
- Good lighting: Proper lighting is essential for accurately applying washes and identifying areas that need attention or adjustment.
- Magnifying glass or visor: Some painters find a magnifying glass or visor helpful when working with small miniatures, as it allows for greater precision and control in applying washes to fine details and recesses.
Having these tools on hand can make the process of using washes on miniatures easier and more efficient, ultimately leading to better results in your miniature painting projects.
How to Use a Wash
- Prepare your workspace: Ensure you have a clean, well-lit area to work in with a palette or mixing surface, clean water, and a brush suitable for applying washes.
- Choose your wash color: Select a wash color that complements the base colors of your miniature. Typically, darker shades are used for shadows, while lighter shades can be used for highlights.
- Mix the wash: Dilute your chosen acrylic paint with water or a specialized wash medium, such as acrylic glazing liquid or flow improver. The mixture should be thin and transparent, similar to the consistency of watercolor paint or ink. You may need to experiment with the ratio to achieve the desired consistency.
- Apply the wash: Using a brush with a fine tip, gently apply the wash to the miniature, focusing on the recesses, grooves, and textured areas. The wash should flow easily into these areas, creating depth and shading. Be careful not to overload the brush, as it can pool on the surface and obscure details.
- Control the wash: If the wash is too heavy or pools too much in one area, use a clean, slightly damp brush to wick away excess wash or redistribute it.
- Let it dry: Allow the wash to dry completely before applying additional layers or paint. Drying times will vary depending on the wash’s consistency and the environment.
- Layer and blend: You can apply additional washes to build up color or create transitions between different areas of the miniature. Layering multiple washes can add depth and complexity to the final appearance.


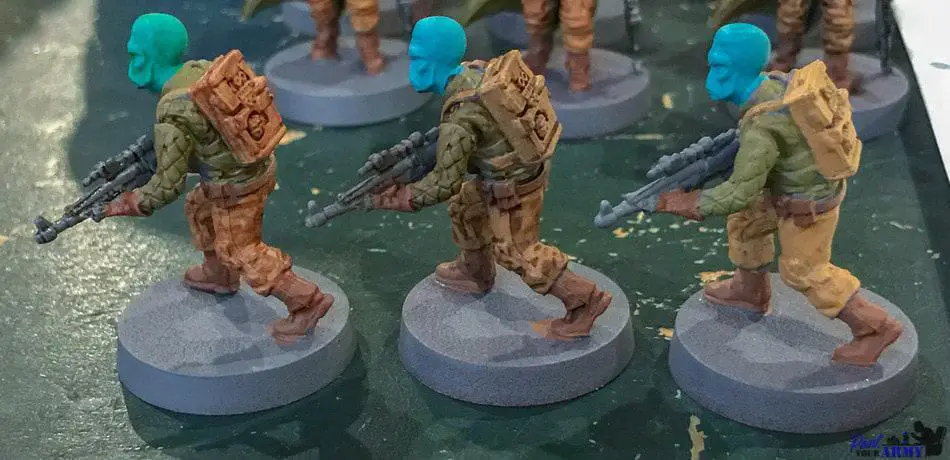
In the above photos of three models, they were all base coated the same, different washes were applied to them to see how they affected them when compared with the one on the right that has not yet been washed.
The model on the left had a green wash applied to the blue skin of his head, a black wash applied to his weapon, a green wash applied to the green jacket, and a reddish brown wash applied to the backpack, pants, and leather parts.
The model in the center had the same Muddy brown color applied sloppily to the entire mini.
Both wash styles added shadows that brought out fine details that were not as present with only the base coat. The finished result is a matter of preference.
Both methods make the models look much more defined. The process took less than a minute for the center model, and a bit longer for the results on the left. The single-color method is great for painting large a number of models for new units that you are adding to your army.
Homemade Washes vs Pre Made Washes
A homemade wash is created by diluting acrylic paint with water or a specialized medium, such as acrylic glazing liquid or flow improver. Pre-made washes, on the other hand, are ready-to-use products specifically formulated for miniature painting and can be purchased at hobby stores. While both homemade and pre-made washes serve the same purpose, there are some differences between them:
- Consistency: Homemade washes can have varying consistencies depending on how much you dilute the paint, while pre-made washes usually have a consistent, pre-formulated consistency designed for optimal performance.
- Customization: With homemade washes, you have more control over the color and consistency, allowing for greater customization. Pre-made washes come in a limited range of colors, and you cannot modify their consistency as easily.
- Quality: Pre-made washes are generally formulated with ingredients that ensure a smooth flow, better adherence, and minimal tide marks. With homemade washes, the quality depends on the paint and diluting agent you use, as well as the mixing ratio.
To make a homemade wash, follow these steps:
- Select a suitable acrylic paint color based on your desired effect.
- Mix the paint with water or a specialized medium (e.g., acrylic glazing liquid, flow improver, or matte medium). The ratio of paint to diluting agent will depend on the desired transparency and flow. A common starting point is 1:3 (paint to diluent), but you may need to adjust this based on your specific materials and preferences.
- Test the wash on a palette or a scrap piece of material to ensure it has the desired consistency and transparency. If necessary, adjust the ratio of paint to diluent to achieve the desired effect.
- Apply the wash to your miniature using a brush, focusing on recesses and textured areas.
While homemade washes can be a cost-effective and customizable option, pre-made washes offer convenience and reliable performance, which can be particularly beneficial for beginners or those seeking consistent results. Ultimately, the choice between homemade and pre-made washes will depend on your individual preferences, budget, and painting experience.
Common Issues People Face When Using Washes
When using washes, people might face several common issues that can affect the appearance and quality of their painted miniatures. Some of these issues include:
- Coffee staining: Uneven, blotchy, or ring-like marks on the surface of a miniature, caused by the wash drying unevenly or pooling in certain areas.
- Tidal marks: Unwanted lines or marks that appear on the miniature’s surface when a wash dries, often caused by an incorrect wash consistency or uneven application.
- Over-darkening: Applying too much wash or using a wash that is too dark or concentrated can obscure the details of a miniature and make it appear muddy or overly dark.
- Poor flow: If a wash does not flow smoothly into the recesses of a miniature, it can result in an uneven finish, with some areas receiving too much or too little wash.
- Inconsistent wash consistency: Mixing homemade washes can sometimes lead to inconsistencies in transparency and flow, which can affect the appearance of the final result.
- Loss of detail: Applying washes too thickly or allowing them to pool excessively can cause a loss of detail in the miniature’s sculpt, as the wash can fill in and obscure fine details and textures.
- Inadequate drying time: If a wash is not allowed to dry completely before applying additional layers or other paints, it can lead to uneven finishes or unwanted mixing of colors.
- Color contamination: Accidentally mixing wash colors, either on the miniature or on the palette, can result in unwanted color changes and a less polished appearance.
- Brush damage: Washes can be hard on brushes, particularly if they are not properly cleaned and cared for. Over time, this can cause the brush bristles to degrade, affecting the application of washes.
- Difficulty with advanced techniques: Some advanced wash techniques, such as feathering, pin washing, and wet blending, can be challenging for beginners and may require practice and experimentation to master.
Tips for New Painters
Using washes can significantly improve the appearance of your tabletop miniatures by adding depth, shading, and highlighting details. Here are some tips for beginners using washes:
- Start with pre-made washes: As a beginner, using pre-made washes from hobby stores can help you achieve consistent results without worrying about mixing the right consistency or color. These washes are specially formulated for miniature painting and can give you a better understanding of how washes should behave.
- Use the right brush: Select a brush with soft bristles and a fine tip for applying washes. A brush with a good belly can hold more wash, while a fine tip allows for precision in application.
- Test before applying: Always test your wash on a palette or a scrap piece of material to ensure it has the desired consistency and transparency before applying it to your miniature.
- Work in sections: Apply the wash one section at a time, rather than trying to cover the entire miniature at once. This will help you maintain control over the wash and prevent it from drying unevenly.
- Apply washes over a light base coat: Washes are more effective when applied over a lighter base coat, as the colors will stand out and the shading effects will be more pronounced.
- Be patient: Allow each layer of wash to dry completely before applying additional layers or other paints. Rushing this process can result in uneven finishes or unwanted mixing of colors.
- Control pooling: Keep an eye on pooling and excess wash on the surface. Use a clean, slightly damp brush to wick away excess wash or redistribute it to prevent coffee staining and uneven finishes.
- Experiment with different wash colors: Don’t be afraid to experiment with various wash colors to create different effects. Darker washes can be used for shadows and recesses, while lighter washes can be used for highlights and blending.
- Practice layering: Learn to build up layers of washes to create depth and complexity in your miniature. Multiple thin layers can create more realistic shading and transitions between colors.
- Clean your brushes: Washes can be hard on your brushes, so make sure to clean them thoroughly with water and a gentle brush cleaner after each use to prolong their life.
Remember, practice is key to mastering wash techniques. Don’t be discouraged if your first attempts don’t turn out perfect. Keep experimenting with different wash consistencies, colors, and application methods until you find what works best for you and your miniatures.
Tips for Experienced Painters
Experienced painters can further improve their results with washes by refining their techniques and experimenting with different approaches. Here are some tips for advanced painters to get even better results from washes:
- Mix custom wash colors: Move beyond pre-made washes and create your own custom wash colors by mixing acrylic paints with a suitable medium, like flow improver, acrylic glazing liquid, or matte medium. This allows you to achieve unique shades and effects tailored to your specific project.
- Glaze with washes: Glazes are similar to washes but are applied to a more controlled area and used to create smooth color transitions or subtle shifts in tone. By using thinned-down washes as glazes, you can achieve more refined highlights and shading.
- Feathering: To create seamless transitions between areas of different wash intensities, use the feathering technique. While the wash is still wet, use a clean, slightly damp brush to gently blend the edges, creating a smooth gradient between the washed and unwashed areas.
- Pin washing: This technique involves applying washes only to specific areas, such as panel lines, crevices, or around details, rather than across the entire surface. Pin washing allows for greater control and precision, resulting in a cleaner, more polished appearance.
- Use multiple wash colors: Experiment with using multiple wash colors on a single miniature to create more complex and realistic shading effects. You can layer different washes or apply them to specific areas to emphasize certain details or create color variation.
- Wet blending: Apply two or more washes to the miniature while they are still wet, and use a brush to blend them together on the surface. This technique can create smooth color transitions and interesting effects.
- Dry brushing after washing: After applying a wash and allowing it to dry, use the dry brushing technique to apply a lighter color to the raised areas of the miniature. This will create more contrast and depth, enhancing the effects of the wash.
- Use washes for weathering effects: Washes can be used to create realistic weathering effects, such as dirt, grime, or rust. Apply washes selectively to areas that would naturally accumulate wear and tear, and experiment with different colors and techniques to achieve the desired effect.
- Control drying time: Some advanced painters use a hairdryer or fan to speed up the drying process or a humidifier to slow it down, allowing for greater control over the drying time and the final appearance of the wash.
- Continue learning and experimenting: Even advanced painters can benefit from learning new techniques and approaches. Attend workshops, watch tutorials, or participate in online forums to gather new ideas and continue refining your wash techniques.
By incorporating these tips and techniques into your painting process, you can achieve even more impressive and professional-looking results with washes.
These are my recommendations of things that I use all the time when painting miniatures
The Starter Paint Set That I Recommend for small budgets
The Starter Paint Set That I Recommend for large budgets
I like to listen to books on Audible while I paint
Check out these retailers to find hobby products
HOBBY STORES
USA / Canada: Noble Knight Games : eBay (US) :
UK: Element Games : Forbidden Planet
Global: Amazon : Redgrass Games : Warcolours
3D PRINTING
Anycubic : Elegoo : Creality : Sunlu : Flashforge : Matterhackers :

